Instructions
To create an optimized route, follow these simple steps.
Step 1:
- Log in and go to your Dashboard page by clicking ArcGIS Routing in the menu.
- Select the Add Route button in the upper right-hand corner. This will take you to the Upload New Route page.
Step 2:
- From the Upload New Route page
-
Download the Excel template to the left.
-
Copy and paste your locations with full addresses into the corresponding columns. The header row must be present in the Excel file for the import to work.
-
The first location needs to be the starting point. This can be your DC or first delivery location.
-
For precise geocoding of your locations you need:
-
To make sure your addresses are correct without spelling errors.
-
Full address is required. This includes Address1, City, State/Province, Zip, Country. (For Canada and UK use the State field in template for Province). Use the Alpha 2 ISO 3166 Country Code. United States = US, Canada = CA, United Kingdom = GB.
-
Locations without City, State or Zip will be excluded from the upload and not be included in the final results.
-
Be sure to rename the template file with the name of your route.
-
Click the Browse button on the right to find your Excel file. Select it and click “Open”.
-
Click "Upload".
-
Once the preview is available in "Import Results", check that the first location is your preferred starting point of the route. If it is correct, click "Process". If it is not correct, click “Clear” to remove the imported data and start over. Alternatively you can drag the desired location to the top of the grid, via the 6 dots on the left, and drop it into the first position.
-
Please note: Your route names will be the same as the Excel file names. If you upload the same file more than once, only the most recently uploaded file will be available on the mobile device. This is how you can add locations to or remove locations from a route. All uploaded files will be available in the Dashboard, even files with the same name. Duplicate file names will be displayed in descending order from newest to oldest. This way you can see previous versions of your route without cluttering your mobile app with old information.
-
Please note: The time reflected on your dashboard allows for an 30 seconds at each stop.
Step 3:
- From the Dashboard you should see your job Status is "JobQueued".
- After a few minutes, refresh the pages by clicking ArcGIS Routing from the menu.
Step 4:
- Keep refreshing until you see the Status change to “JobSucceeded”.
- From the Dashboard you can look at the details, download your optimized route as an Excel file and look at your locations on Google Maps.
- Click "XLSX" to download your route as an Excel file. If the job was successful, then your file will be sequenced and include turn-by-turn directions. If the job wasn’t successful, then please let us know by going to contact us at the bottom of the page. We will respond via email as quickly as possible.
Step 5:
- Enjoy your ad-hoc optimized route by Route Trax – Ad-Hoc Routing!
To set up you mobile Routes.
Step 1:
- Log in and go to your Dashboard page by clicking ArcGIS Routing in the menu.
- Select the Mobile Configuration from the menu. This will take you to the Mobile Configuration page.
Step 2:
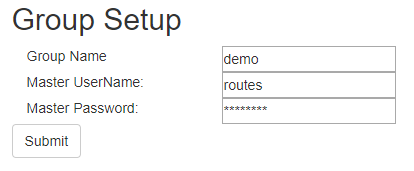
- From the Mobile Config page
-
Add a Group Name
-
Add a Master User Name
-
Add a Master Password
-
Click Submit
Step 3:
Once you have completed Group Setup, you will see your routes that have been uploaded. They will already be assigned a User Name and Password. You can chenge this by selecting Edit in Manage Records section.
Step 4:
- Download the Route Trax - Ad-Hoc Routing from the app store of your choice. Click on one of the images to the right to goto your respective app store.
Step 5:
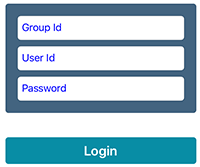
- Login in to the app with the credentials for the route.
- Alternatively: If you want all your routes on one device then login with the Group Id, Master User Name and Master Password.
Step 6:
- Enjoy your ad-hoc optimized route by Route Trax – Ad-Hoc Routing!


